We sew a hood
Things with a hood do not come out of fashion because they are comfortable and functional. What you need to know, starting the pattern of the hood? How to properly sew?
Sticks of clothes with a hood appeared at the time when about fashion and did not think. In the Middle Ages, the tailors already knew how to sew a cape with a hood, since this type of clothing was in demand by all layers of the population – versaging – commoner and to know.
Hooking a hooded face, noble señoras seduced poor girls, and tramps made multi-family transitions. This type of clothing was forbidden to wear persons who did not confess Christian religion – therefore, the Inoverts were visible immediately.
In 1527, a convenient addition to cloaks and capes began to be called a hood – by analogy with the French hood.
Currently, this element of clothing is still popular. It can be functional and be a decorative decoration. Especially often they are complemented by sportswear, the motto of which is practicality and convenience.
Building pattern
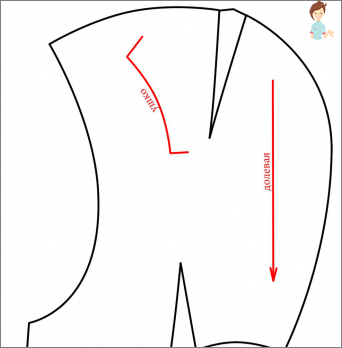
Before sewing poncho or a hooded robe, you need to learn how to build a pattern:
 Measure the girth of the head and the distance from the top to the articulation of the shoulder (this is the easiest way to build a pattern);
- The drawing is built from the bottom angle;
- From the point spend 2 lines at right angles – right and up;
- from the source point for all sizes mark 4 cm up and already from it 1 to the right (so as not to get confused, this point is denoted by B).
- Measure the length of the neck of the backrest and the shelf – for unfamiliar with the sewing case – the front part;
- From the point in spending a segment to intersection with the already drawn lower catat of the direct angle – the length of this segment is equal to the sum of the length of the neck of the transfer and the back plus 3 cm on the sweep;
- To determine the location of the molding, from point A marked the distance equal to the length of the neck of the back + 1.5 cm – these one and a half cm. Half of the molding;
- Cutting height 8-10 cm. This distance is postponed at right angles. Noting on both sides of 1.5 cm, they will drive them – the image of the molding is obtained;
- The height of the product should be no less than the length of the head + 3 cm. If you want volume, add more to the increase;
- The width is calculated – 1/3 of the scuffing of the head + 4-9 cm;
- The width of the hood is deposited at a right angle from its height, build a rectangle;
- It draws the top edge of the product. It makes direct or stuck in the lecture;
- To the left of the angle down, 1.5-2 cm is noted, and they are connected slightly concave line with the end of the C1.
General tips on tailoring fashion element
How to sew a hood with your own hands?
 Start the manufacture of add-ons to clothing with the construction of patterns;
- Then it is transferred to the fabric, not forgetting about the wrappers. If it is planned to sew from a whole cut, the fabric is driving when layout, out of 2 – strokes along the central seam before work with the details;
- If the material is soft, it is desirable to sample with adhesive gasket – Dublerin. The edges of Dublerin so that it does not lure, processed on overlock or stitching zigzag;
- Outtacks are stitched, the details are folded to face and stitch;
- The product is sipped, seams are wearing;
- If necessary, the hood was planned with a lining, make up the pattern for her. The existing dimensions are reduced by the value of the wrap – 8 cm. The lining is sewn with swelling, starting the seams;
- On the fabric from which the hood was sewn, the wrapper is planned. 10 cm strip width;
- The product is turned inside out, and admonish the slip;
- Excess fabric cut, not forgetting to add 1.5 cm – it is necessary in the future to sew a hood to the product;
- To the edge of the hinge sewn, thanks to which the fashionable element of clothing will join that thing for which it was intended. Buttons are sewn into the attachment;
- After fitting, making sure that nothing will have to reinfive, you can already sew the main part and lining. After the firmware, the hood turned through the hole in the seam – so put on pillowcase on the pillow;
- Then processed the unlocked edge, pass the finishing line throughout the front edge. If you need, Kant is adjusted to it.
No need to solve the problem, how to sew a raincoat or coat with a hood. The hood can be fastened to any product.
Products with hoods
It is not difficult to understand how to sew a hood sweatshirt using the already proposed algorithm. But in order to sew yourself poncho with a hood, even the pattern does not have to make.
Required materials and tools:
- a piece of square tissue – 120cm x 120cm;
- Separate pieces of fabric – 60×60 and a little more, for cleaning;
- scissors;
- sewing machine.
 The square is folded diagonally twice to get a triangle;
- The sharp angle is cut down the arc with this calculation so that the head passed into the resulting hole.;
- The square piece of 60×60 is twice the triangle, and stitch perpendicular to the edge. Turned – a hood ready;
- From a small piece, it is cut out of a slide, processed the workpiece, from the bottom side of the product sewn the segment of the fabric in a width of about 8 cm, so that it is neatly sunk to poncho on the inside.
Poncho with sharp hood Ready. Catching can be decorative or run from the same material.
Fur products to which cohesive and fur coats are purchased for one year. When buying usually try to choose long models to feel «lady». And then it is found that a long fur coat is inconvenient. Interferes with a trip in own car and in urban transport.
When the fur coat is shortened, there are slices that thorough.
Of them can sew Removable hood for fur coats:
 The construction of the pattern is carried out according to the already described scheme, but height is added no less than 14 cm – the fur is plundering a distance;
- You do not need to try to arrange pieces so to get a solid product. If it is sewn from halves, the hood is better than it;
- Lining required. It can be made of fleece or satin. It is desirable that the color of the lining of the fur coats and the hood coincided;
- Fur is easier to cut the blade;
- Parts of the hood before the final firmware are estimated from 2 sides, the patches are neatly straightening;
- on the allowance and pulp fur cuts;
- It is unlikely that at home there is a special overlock or machine for sewing fur products. The hood will have to sew through the edge manually, a sharp needle. The lining is comparadened with a typewriter, fell, and are also damped manually;
- The lining is embossed, then the product is turned, process the edge and sewed loops.
Make a hood is not difficult, even if there is no garment experience. To do it, sufficiently stock patience and show accuracy. Thing will look good if all seams are processed carefully.


