Box do it yourself: how to make it
You want a casket, but you never found anything cute in stores? Then try to make the caskool of your dreams with your own hands using branded materials
Almost every girl is the owner of a huge number of decorations. And all this wealth must be added somewhere. That is why today we will talk about the boxes. Back in ancient times, these small, but very beautiful boxes were the subject of the pride of a woman. And judging by archaeological excavations, such a subject appeared in ancient Egypt. In those distant times, the caskets were made of wood decorated with carvings.
 To the industrial revolution, such a product was a big rarity, and only very wealthy ladies could have. Today, due to the high level of development of technology and a huge amount of materials, a box can get each of us.
And, by the way, if you don’t want to go shopping and spend a lot of time searching for something special, then you can make a small bowl with your own hands.
How to make a box of cardboard
Perhaps one of the most affordable materials for creating a casket – it’s cardboard. In this case, you should not have any problems with the purchase of material, and the cost of such a craft will not be too high. So let’s consider one of the options for the manufacture of such a subject from cardboard.
In order to create the first option you will need:
- Several sheets of cardboard;
- Sharp stationery knife;
- Simple pencil and ruler;
- High-quality glue, best to stop your choice on PVA.
So, proceed! First take one sheet, and draw a few rectangles on it. Size depends exclusively because you are going to put inside. Each rectangle in the future will be a deepening to the cable.
After the rectangles are drawn, you will need to cut them along the contour using the stationery knife. So you get a kind of template. Using it you need to cut rectangles in several sheets of cardboard. Now armed with glue and glue all sheets as shown in the figure.
And one more thing: before gluing sheets with holes, glue five or six one-piece sheets. So you will get a pretty durable bottom for your product. By the way, the depth of each compartment may be different.
To do this, you just need to not cut in each sheet the same number of rectangles. For example, the deepest will be the first hole, it means that you cut out this rectangle on all sheets. The second square will be slightly less deep. It means you need to cut it only since the fifth sheet of twenty. In the same way we make very small holes.
In order for the box coolerly bonded, put on top on the finished product of some big, rectangular item. Note that it should be hard for the sheets of cardboard pretty so. Leave such products for the night under load, and here it is your casket made by hand. If the design seems to you too simple, then you can decorate it in any way.
How to make a casket from paper
 If for some reason you don’t have a cardboard, and the casket is really needed right now, then you can use paper. Of course, no one speaks about the usual A4 leaves, which are designed for printing. You need dense, construction paper.
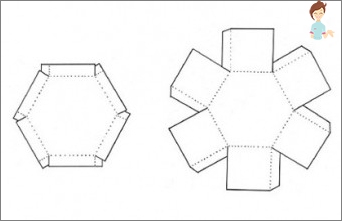
Actually, the methods of making a box of paper sheets are not so much. Optimal is cut out full cutting and further gluing parts. The method, of course, time-consuming, but the result will strike with its originality.
Today we will try to make a hexagonal cabinet. To do this, you need to cut her layout as shown in the picture. Now bend the paper on the dotted line. Those parts that are bent on the left side of each wall will serve as fasteners that will be held at the expense of glue.
Attention! We glue each fold from the inside of the casket. And here is the frame of our casket ready! Exactly according to the same principle and make a lid.
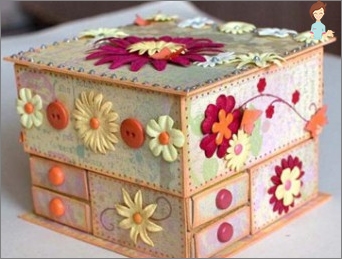
After the casket frame is ready, you can decorate it as you want. For example, you can make several volumetric colors or paper bows and glued to the edges of the frame. And you can draw something beautifully with multi-colored chalk. Another option to decorate can be considered gluing small pieces of fabric and lace. So turn on fantasy and create!
How to make a box of box
And now we will try to make a jewelry casket.
To do this, you will need:
- Small box;
- Velvet or velvet fabric;
- A small piece of foam rubber, the thickness of which should be about 1.25 centimeters;
- Small sheet of durable cardboard. However, if there is no such, you can use the cover from a conventional notebook;
- Stationery knife, pencil, ruler, thermochelery gun.
Start the manufacture of our casket. For a start, cut a rectangle from cardboard, the size of which will be three or four millimeters less than the bottom of the box. Put it on the bottom of the cardboard and mark, at what level the lining under rings and earrings will end.
Now we take the foam rubber and cut it into small stripes. As for the fabric, it will be used to cover the foam rubber. After the stripes are covered, you put them in the box one near the other. One roll of fabric and foam rubber need to be put across to divide the zones in the box.
How to make a box casket
The minus of this box can be the fact that you have to spoil one of the books. But if this question is not fundamental for you, you can safely start creating. For the manufacture of such a cute thing you will need a thick book.
Turn over several pages and start cutting the middle of the pages. You should not get to the last page, just like first, we leave the box at the bottom of several pages.
After all pages are cut out, you need to thoroughly glue the whole book. While the book pages dry, you can decorate. For example, an excellent decor option can be lush paper or fabric flowers on the cover. Although if you want to make a cache from such a book, you can just put it in the closet after the glue dries.
Attention! If you put this casket into the closet, you should carefully remember exactly where you put it. Otherwise, your jewels and money you will look for quite a long time.
How to make a wooden box with your own hands
If all previous light options are not suitable for you, and the soul asks something that will be stored for centuries, you can draw your attention to a wooden bowl. Do it, of course, is much more complicated than from paper or book, and you will need special tools.
First you need to decide on the form of your product. You can choose any configuration, the only thing you need to remember – then all these bumps and hearts will still need to drink from the tree. So when choosing, we advise you to consider your level of skill.
Now with the help of a milling machine, we attach our two billets from the tree the right form. Following this process the edges of a curly mill, so that our box looks more solid.
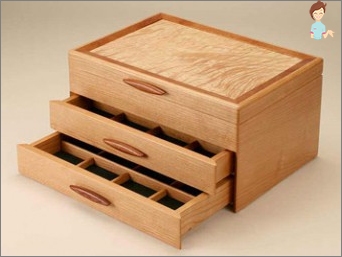
 In order to assemble the frame, take three identical planks, the thickness of which should not be more than one centimeter. We glue these skips to the bottom. After that, you can take some small does and on the same principle to glue one or two drawers. Insert them into the box.
Check, is we well calculated the height of the box. If everything is fine, pull out the boxes and gently glue the lid.
So, we dealt with you how to make a casket with your own hands. As you can see, there is nothing particularly difficult. The main thing is to be patient and everything will turn out.
Such caskets are good because care for them is practically not needed. Just watch anywhere nearby there is a liquid. So take the materials and create!


